
|
Author(s)
Jacqui Fletcher
|
Contents
|
|
Published:
May 2007
Last updated: May 2007 Revision: 1.0 |
Keywords: Difficult-to-dress areas; wounds; dressings; dressing application; cutting dressings to fit.
Most standard wound dressing products can be used to support healing in even the most difficult to dress wound sites.
Manufacturers produce dressings in a range of ready-made shapes to fit wounds of various sizes. Where a suitable dressing is unavailable, it is often possible to cut or adapt a product to fit.
Practitioners need to be creative to deal with wounds in a practical and cost-effective way.
Wounds in some areas of the body are particularly difficult to dress, despite the wide range of dressing products available. This paper aims to set out some generic principles that may assist when dressing wounds in awkward areas.
It is widely documented that patients with chronic wounds identify problems such as malodour, dressing leakage and pain as high on their list of priorities[1]. If these are not dealt with the patient may withdraw from social contact and become isolated because of embarrassment or curb their activities for fear of dressing leakage.
Despite the existence of a huge range of dressing products in a wide variety of shapes and sizes, dressing wounds in some anatomical areas continues to be a challenge for many clinicians. Although dressing manufacturers have designed products to cope with the curves and uneven textures of living human anatomy, these are usually limited to one or two sizes. However, it is possible to adapt these ready-made products.
The first step in ensuring a good dressing fit is a thorough, holistic assessment of the patient. This must consider factors such as how the patient's lifestyle impacts on the dressing. For example, if the patient is an otherwise fit and healthy child it is likely that the dressing will be subjected to considerable wear and tear and this should be considered during selection. In addition, the patient may see other objectives as a priority over wound healing and meeting these is vital in obtaining concordance.
Previous dressings used should be reviewed and any problems that occurred considered. An example of this would be a dressing that always leaked from, or failed to stick at, one particular edge.
Once the patient's needs have been identified and the dressing requirements ascertained, the best solution may be to adapt an available dressing. Many standard square or rectangular products can be cut and folded to make appropriate shapes to fit different sizes of wounds. Pre-formed shapes designed for specific body areas such as the heel may also prove to be useful elsewhere on the body, for example in the axilla.
When cutting and shaping products a number of key principles should be borne in mind:
Follow local infection control guidelines to prevent infection and/or cross-infection
Always use sharp, clean scissors when cutting products to prevent shredding of dressing edges and contamination
Always cut across the peelable back on adhesive dressings, otherwise the backing paper will be difficult to remove
Round off cut edges to reduce the chance of uneven edges catching on bedding and clothing
For adhesive dressings, keep the backing paper as a template for future use; for non-adhesive dressings, trace the outline on to the packaging
Do not cut absorbent materials that contain super-absorbent powder or granules or dressings that liberate cellulose fluff pulp as this would release particulates into the wound
Most manufacturers recommend placing a dressing centrally over the wound. Consider the effect of gravity and place the dressing to account for the direction of fluid drainage
Do not apply dressings or tape with too much tension as this may cause blistering or a tourniquet effect
Always take care of the surrounding skin. Use of skin protection is generally recommended - for example skin protectant wipes or barrier creams
Bear in mind that although some dressings may provide padding and reduction in friction, they may not relieve pressure
Thin products conform better than their thicker counterparts and are less likely to roll at the edges. Although inherently less absorbent, if a thin dressing stays in place its use will be more cost-effective than that of a thicker dressing that leaks or rolls
To improve the adhesion of an adherent product, gently warm it by rubbing between the hands before application
Where necessary, carefully remove any hair from the area before applying a dressing.
Areas that clinicians may find difficult to dress include: ears, axillae, joints, hands, sternum, the peristomal area, buttocks and sacrum, feet, heels and digits. Other problematic areas that are more complex include peri-anal and perineal regions. Some of the principles discussed here may help when dealing with wounds in these areas but they have very specific problems outside the remit of this guide.
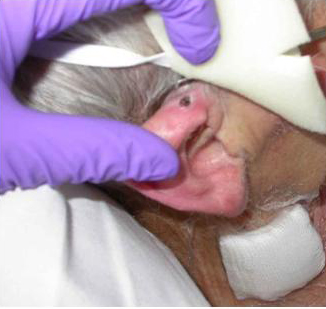
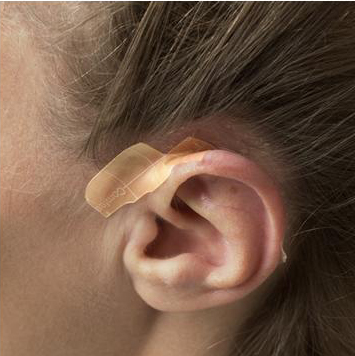
Occasionally patients develop pressure damage on their ears. This is most commonly caused by tubing or elastic from an oxygen mask held tightly in place to ensure patients receive adequate oxygenation. This problem is frequently compounded by wearing glasses. Similar problems also occur on the nose, either over the bridge or around the nostrils.
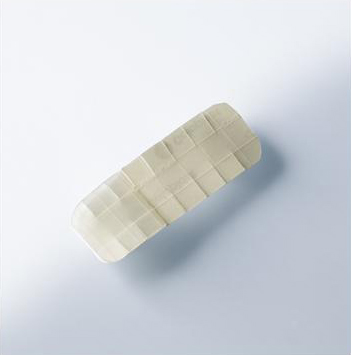
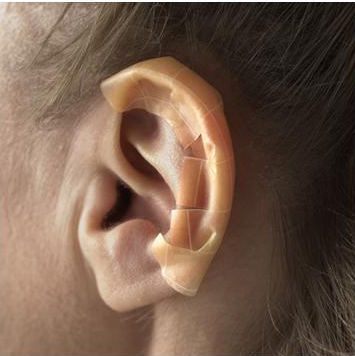
For pressure ulcers on the curve of the ear (see Figure 1) use a thin hydrocolloid dressing (5x7cm). Cut the hydrocolloid into a strip, fold in half lengthways, then cut a fringe along one edge (see Figure 2); the cuts should be approximately 0.5cm apart. Apply the uncut edges of the dressing first and then use the cut edges to fold around the edge of the ear (see Figure 3). A small piece of alginate may be used underneath if the wound is exuding.
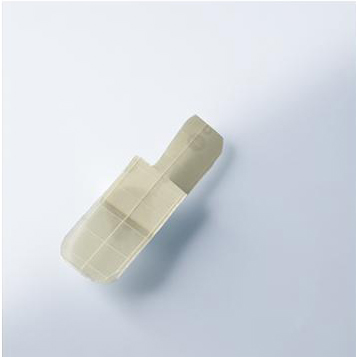
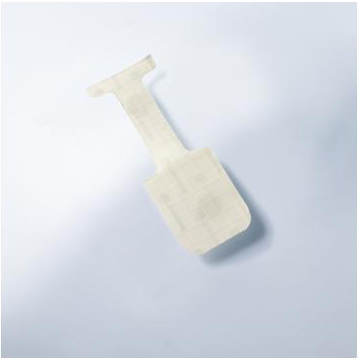
For wounds at the point where the ear joins the head, a small rectangle of thin hydrocolloid (approximately 5x7cm) is required. Fold the dressing in half lengthways. One-third of the way along, cut the dressing up to the fold (see Figure 4). Apply the longer piece of the dressing above the ear, with one square folded over the ear and use the other square to secure the dressing (see Figure 5).
It is always preferable to anticipate pressure damage and act to prevent it. Prophylactic use of a thin hydrocolloid in patients wearing oxygen masks may protect the ears from friction and pressure damage.
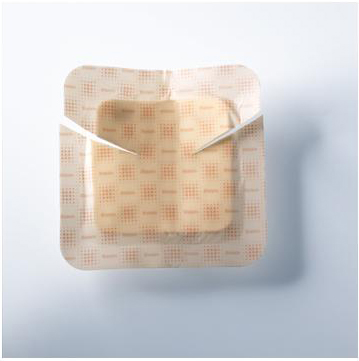
Axillae are difficult to dress because of the deep curve and because movement is required at the shoulder. There may also be problems related to hair and moisture in the area. Foam dressings work well in this area (see Figures 6 and 7). To allow the dressing to conform to the axilla and the patient to be able to move, make deep cuts into the dressing to allow it to bend, or use ready-made manufactured shapes that already have this feature.
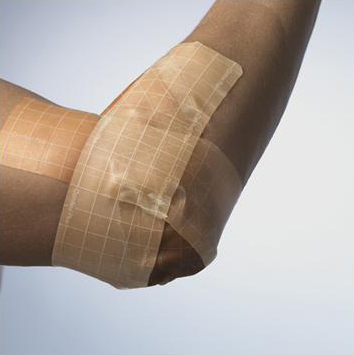
Unless there are specific clinical reasons to the contrary, as much mobility as possible should be retained in joints to stop them becoming stiff and painful. Dressing application should allow for both extension and compression if movement is to be maintained and a functional seal achieved. Joints should be dressed in a neutral position and mobility checked to ensure that the patient is able to work with a physiotherapist and to mobilise. Dressings intended for heels often work as well on elbows and vice versa.
A square product can be cut to fit around the joint (see Figures 8 and 9).
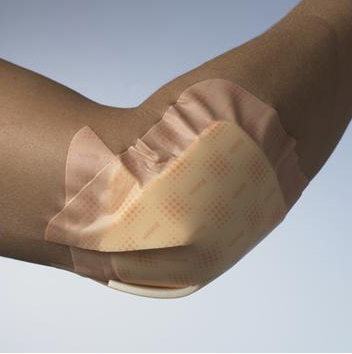
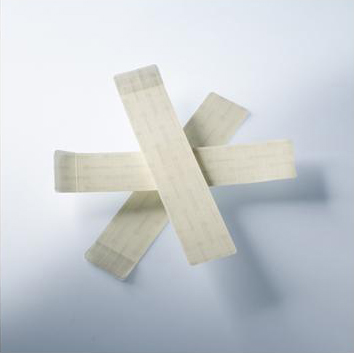
Using multiple strips of dressing gives increased flexibility and movement and therefore this technique works well only with thin products such as thin hydrocolloids or films. For most sizes of heel or elbow a 15x15cm dressing cut into three equal strips (remembering to cut through, not in line with, the peelable back) is sufficient (see Figure 10). However, for some large swollen joints, especially knees, two dressings cut into up to six strips may be required.
To apply, the joint should be held at a right angle as this gives the best flexibility when complete. The first strip of dressing is applied directly over the angle of the joint; the second strip is applied overlapping one edge of the first but at an angle of approximately 30 degrees. The third strip is applied in the same way but over the other edge of the first strip. The dressing is then moulded to the shape of the joint (see Figure 11). This dressing is very flexible and provides a close fit to the joint. For larger joints, continue to add additional strips to the outer edges until adequate coverage is achieved. As additional strips are added the angle of application will be less steep and become almost parallel to the previous strip.
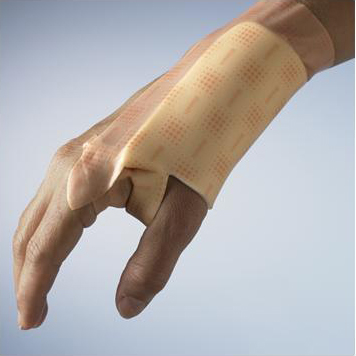
Hand dressings can considerably restrict an individual's activities because they are usually required to keep the area still and dry. These are not easy objectives for patients to achieve so, where possible, dressings should be used that minimise restrictions to normal daily activities. Dressings that are waterproof and do not limit function and movement are preferable. For wounds to the margin of the hand a dressing can be anchored over a single digit and then moulded to the side of the hand (see Figure 12).
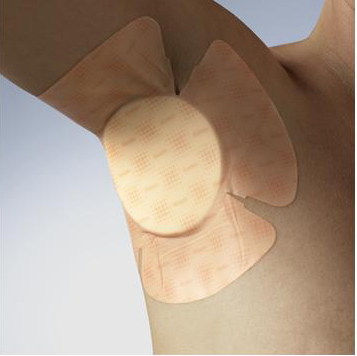
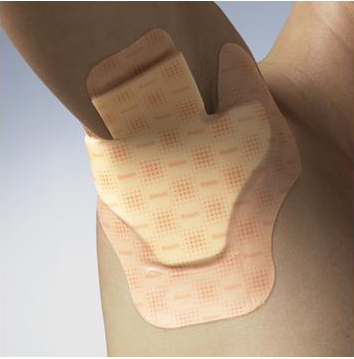
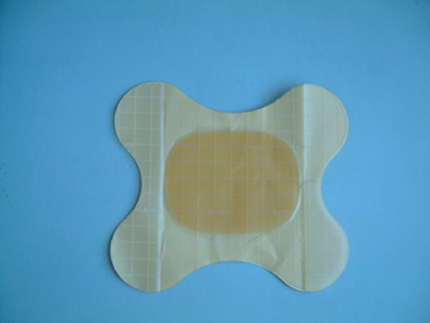
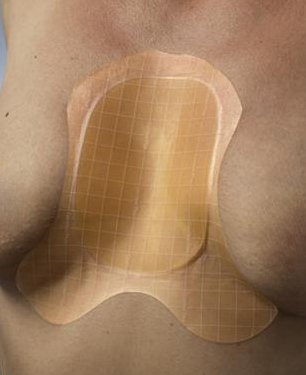
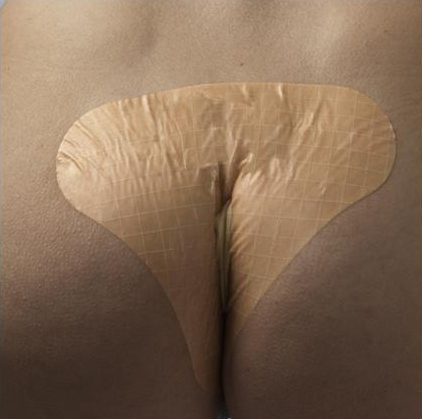
The majority of sternal wounds are straightforward surgical incisions that heal without complication and so do not present problems. However, some wounds become infected, dehisce or simply fail to heal. A particular problem in this area is that, because of gravity, any exudate drains downwards towards the abdomen. When the dressing's capacity to absorb the exudate is overcome, exudate may spread along the creases below the breast area and may cause maceration of the skin. If a conventional dressing is the appropriate product, a butterfly-shaped hydrocolloid for example can be adapted to fit well here (see Figures 13 and 14). An alginate dressing or similar may be applied underneath for absorbency or, if the wound is very wet, a foam product may be cut to the same shape. Additional fixation may be required when adhesive dressings are cut.
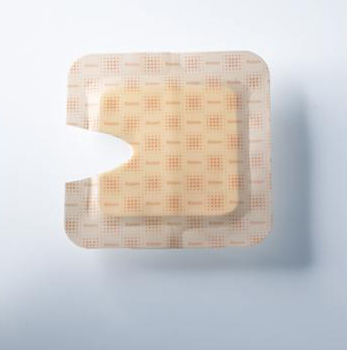
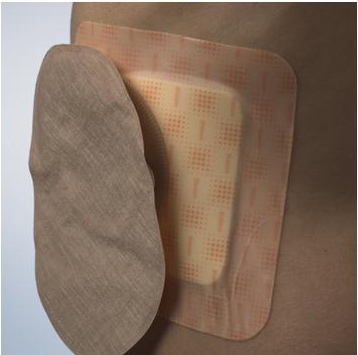
Care should be taken when applying a dressing to a wound near a stoma. Where possible, the dressing should be shaped or placed to avoid overlapping the stoma wafer. However, when the stoma wafer and dressing product must overlap because of their proximity, place that which requires changing most frequently on top to allow for easy removal (see Figures 15 and 16).
It is often difficult to get a good dressing fit on the sacrum. The shape, size and skin texture of this area can vary dramatically. The sacrum on an obese patient may be difficult to manage because of the lack of space between the buttocks. This may make the dressing difficult to position and, once applied, it may be uncomfortable for the patient. Conversely, patients may have sharp bony protrusions over which it can be difficult to curve dressings. Others may have very loose wrinkly skin on the buttocks to which it is extremely difficult for dressings to adhere.
Wounds near the anus can be complicated. There may be only a small area of skin between wound and anus. Hair and moisture in this area may also complicate application.
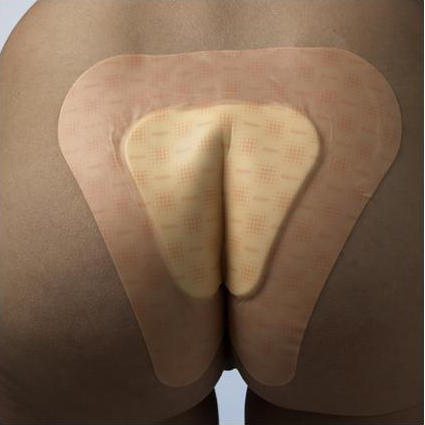
Most manufacturers produce specific dressings for this area which can work well - on patients with average-size buttocks (see Figures 17 and 18). All the sacral dressings produced are rounded and curved, which help conformity. The thinner the dressing, the better the fit that can be achieved. The area is subjected to high friction, particularly when patients with limited mobility spend long periods in bed or a chair. As a patient slides down a bed or chair considerable force is placed on dressing edges. Thicker dressings will tend to roll and ruck up, often causing further skin damage in the process.
Sacral dressings need sufficient time to stick properly before the patient puts any weight on the area - otherwise they may fail to adhere. Where possible, the patient should be encouraged not to sit or lie on the area for 20 to 30 minutes after application of the dressing. Hydrocolloids or adhesive foam products are most commonly used here.
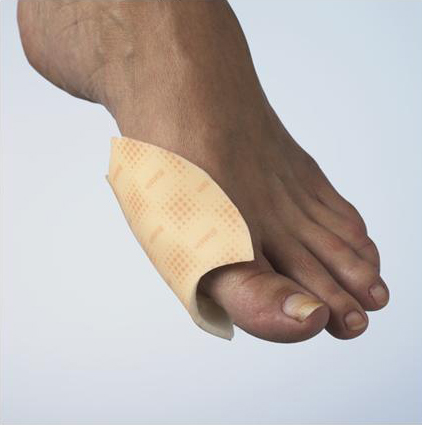
Wounds to the foot are particularly common in patients with diabetes or arthritis. The primary problem is finding products that are effective within the enclosed space of footwear and that will stay in place when subjected to pressure and twisting as the patient walks. For dressings over bunions or swollen joints it is important to consider the direction of drainage. Exudate will tend to drain towards the plantar surface (sole) of the foot, so the greatest area of dressing should be positioned with this in mind. See Figures 19 and 20.

In patients with diabetes regular inspection of the wound is required in order to observe for infection. This is because a patient with an insensate foot may not notice the pain or irritation of an infection. Therefore either a transparent product or one that is designed for frequent dressing changes is preferred. A product with an average wear time of three days or more is not cost-effective if other factors require the dressing to be changed more frequently. Furthermore, removing adhesive products before they are ready to be removed increases the risk of trauma.
Many companies now manufacture dressing products specifically for use on the heel (see Figures 21 and 22). They are either folded around or 'cup' the heel. Many of these designs are very good for heels of average size. However, if the patient has gross oedema (or lymphoedema) and therefore a large, swollen foot or the patient is a child or a baby with a tiny foot, the shaped products available may not fit. However, the majority of shapes used by manufacturers can be replicated by cutting one from flat pieces of product.
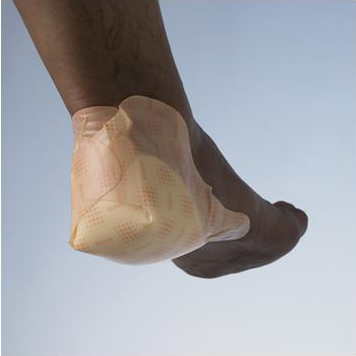
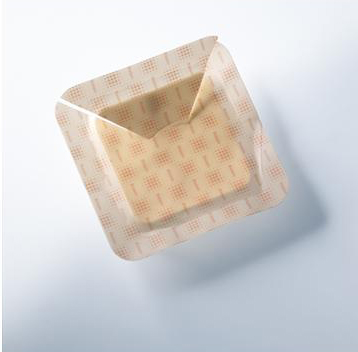
It is not always necessary to use a specific shape - square products that are cut and then cupped around the heel will often work well (see Figures 23 and 24). However, the minimum size recommended when cutting and folding dressings this way for an adult is 15x15cm because smaller dressings do not give adequate coverage. The larger size also means that the edge of the dressing should reach the arch of the foot rather than the flat of the heel, so is less likely to catch and roll up if the patient attempts to push him or herself up the bed or chair.
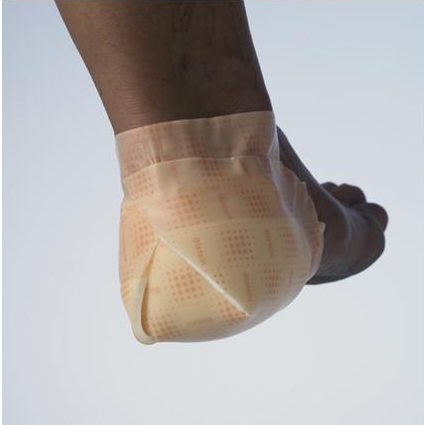
When folding and sticking the dressing, consider which edges will be exposed to pressure. For example, if the dressing is applied first to the bottom of the foot and then folded up around the back of the ankle, the cut edge of the dressing is exposed and is likely to roll when the foot is pushed into a shoe. However, if the dressing is folded first around the ankle and then underneath the foot, the smooth edge of the dressing will slide into the shoe.
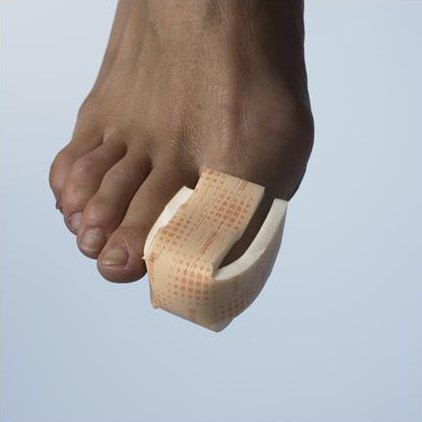
Dressing toes can be difficult because of the lack of space between toes that overlap or are cramped and also because bulky dressings may cause additional pressure when enclosed in footwear.
Fingers are easily knocked and frequently get wet. Extra padding may help patients - particularly manual workers - perform more tasks safely. Wearing plastic gloves when bathing or washing up may prevent the dressing becoming wet. It is also usually necessary to try to maintain mobility in the rest of the hand.
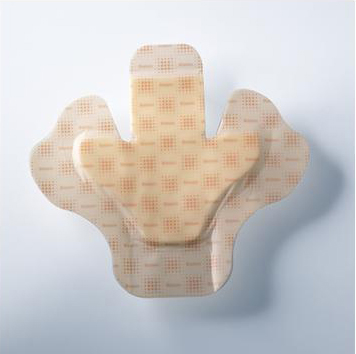
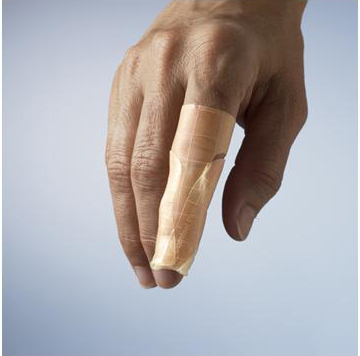
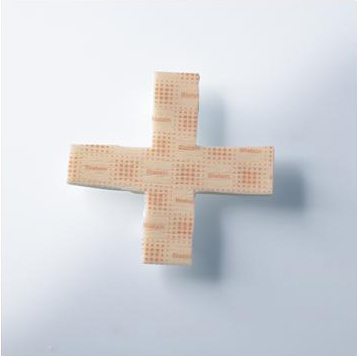
When dressing toes and fingers, care should be taken not to fully encircle the digit in a way that may cause a tourniquet effect should the digit become swollen. Therefore tape and adhesive products need to be used with caution. Tubular bandages are especially useful. Metal applicators are available to help ease the bandage over painful swollen areas. The inner tube from paper towels may be used if such applicators are not available. Adhesive dressings in small sizes may be simply folded over the finger and sealed at the sides. Some shapes that work well are shown in Figures 25, 26, 27 and 28. Often a non-adhesive dressing with separate fixation works better on feet as the tapes may have the adhesive qualities and stretch capacity necessary to cope with the forces applied to the feet during walking.
It is common for fungal infections to be present between toes. In these instances an appropriate antimicrobial product used for a short time may be of benefit and should improve the sogginess and maceration of the skin that occurs with infections such as Tinea pedis.
With a little thought and creativity most anatomical areas can be dressed using a relatively small range of dressing products. This is cost-effective practice and increases the chance of the practitioner being familiar with products and therefore more confident and competent in their use. Many people are reluctant to experiment with cutting dressings into different shapes because they see it as wasteful. However, using products that do not perform optimally because of poor fit and conformability is also inefficient. Such dressings may also require changing more frequently and may cause traumatic skin damage on removal.
It is the practitioner's responsibility to ensure that they have fully assessed the patient and their wound and then, in conjunction with the patient and their carers, set appropriate and realistic objectives of care. In order to achieve the objectives and provide high standards of care the practitioner must have a good understanding of how dressing products work and of their limitations. This will encourage innovative and holistic care that meets patient-centred goals while working in a cost-efficient way.
1. Franks PJ, Moffatt CJ. Do clinical and social factors predict quality of life in leg ulceration? Int J Low Extrem Wounds 2006; 5(4): 236-43.